It’s time to get serious about ai.
Build Your Own AI Bidding Tool and Landing Page in 1 Weekend
PART FOUR
Brief Builder Tool
Unzip it, put it in a folder on your desktop, add your API key, and build your design briefs with confidence.
You can see how I developed the Style Guide Tool in this Claude session.
Today: A simple daily tool to keep you on track. Just drag the index.html file to your browser. It will only clear when you do it, so refreshing during the day will not change it.
Idea Bank: A simple web-based tool that you can use to keep up with ideas you have. Simply drag the index.html page to a browser window. It will not clear until you clear it.
Meeting Notes
Quick recap
The meeting focused on teaching participants how to use AI tools like Claude and Gemini to convert text bid documents into HTML format for client proposals. Don led the session by demonstrating the process of creating design briefs from website URLs or images, then generating HTML files that could be customized with business logos and colors. Participants practiced the technique by converting their previously created bid documents into HTML format, with some successfully generating polished client-facing documents while others encountered technical challenges. The session included discussions about file naming conventions (using “index.html” format), folder organization, and the importance of keeping API keys secure. Participants shared their screen outputs to review the results, with some achieving professional-looking bid documents while others needed additional guidance on the process.
Next steps
Don
- Upload step-by-step procedure documents (Page 5) by Tuesday
- Upload videos from the session by tomorrow morning
Mike
Collaboration
- All participants: Continue working on building and troubleshooting their landing page projects using the provided instructions and tools, ensuring all files (HTML, images, logo) are correctly named and organized in folders as specified
- All participants: If encountering errors with the Brief Builder or landing page tool, follow the process of sending screenshots and details of errors to Claude (or appropriate AI) for troubleshooting, and ensure correct API keys are used
- All participants: Prepare their landing page projects for review at the next class meeting (scheduled for next Saturday at 1PM)
- All participants: Review the uploaded videos and step-by-step instructions before the next meeting
- All participants: Ensure their project folders are organized with index.html and images folder as per Netlify requirements
- All participants: For those with logo display issues, ensure logo is in .png 24-bit format named “logo.png” and placed in the images folder
- All participants: If images are not displaying, check for correct naming (card1.jpg, card2.jpg, etc.), all lowercase, and ensure images folder is not capitalized
- All participants: If needed, ask Claude to rewrite/fix their index file if elements like logos or images are not displaying correctly
- All participants: For those who successfully built their landing pages, copy the link to share with others
- All participants: Keep all project files in one dedicated folder for easy management
- All participants: Limit open browser tabs to 2-3 relevant ones while working on these projects for better workflow management
- All participants: If using Mac, ensure downloads are saved directly to the correct project folder rather than the default downloads folder
- All participants: If needed, resize and export logo files to ensure they display correctly on the landing page
- All participants: If using Visual Studio Code, continue working on fixing any code issues (as mentioned by Laura)
- All participants: If images are not showing, check that the images folder name is exactly “images” (all lowercase) and contains the correctly named image files
- All participants: If API key issues persist, ensure the correct API key is copied entirely and pasted into the tool
- All participants: If the brief builder tool is not working, try moving the folder to the desktop and dragging the HTML file into a browser window
- All participants: If the brief builder tool is not working, try using the “browse” option to upload the image rather than drag and drop
- All participants: If the brief builder tool is not working, ensure the folder name does not have .HTML extension
- All participants: If the brief builder tool is not working, ensure the correct model string (Claude Sonnet 4-5 or latest) is being used
- All participants: If the brief builder tool is not working, ensure the tool is being used in Claude (not ChatGPT)
- All participants: If the brief builder tool is not working, ensure a valid personal API key is being used (not a sample key) and that the key is saved immediately after creation
- All participants: If the brief builder tool is not working, ensure the API key starts with “SK” followed by a dash
- All participants: If the brief builder tool is not working, ensure the API key is entered correctly in the tool
- All participants: If the brief builder tool is not working, ensure the correct file (brief-builder.HTML) is being used and not a folder
- All participants: If the brief builder tool is not working, ensure the correct image is being used (screenshot of a design, not just any photograph)
- All participants: If the brief
Summary
Nikon ZF Camera Discussion
The discussion covered several topics related to photography equipment and personal projects. The speaker discussed the Nikon ZF camera, highlighting its retro design and internal specifications, including its 24-megapixel sensor and processor similar to the higher-end Z8 model. They compared the ZF to the D850, noting the D850’s advantages for high-resolution work and professional ergonomics, while the ZF offers better portability and modern shooting experience. The conversation also touched on personal photography projects and the use of digital note-taking tools like Notebook LM for organizing research resources.
Research Document Management Demonstration
Cuevas demonstrated how to upload and organize research documents into Notebook, including both PDFs and Google Drive files, and showed the process of converting research notes into sources. They explained how to use the chat feature to ask questions and generate reports, with the ability to customize writing styles including APA 7th edition format and journalist style. The demonstration included creating a report about car design in the 1950s and converting it into a book chapter, with specific attention to formatting for car enthusiasts who are well-educated and interested in unique details.
AI Document Generation Tools Discussion
The group discussed using AI tools to generate documents, reports, and infographics. They explored features like sharing notebooks and customizing color schemes in their documents. Debra shared how she customized the color palette in her bid sheet by using hex codes and modifying the parameters. The conversation then shifted to casual greetings and comments about Don’s appearance, noting his change from wearing all black to more colorful attire for Mother’s Day.
Web Design Tools Training Session
The team discussed using tools like Visual Studio Code and Dreamweaver for editing web files, with Don demonstrating how to use these tools to edit HTML and CSS. They explored creating design briefs using AI tools like Gemini, with Don showing how to generate design specifications from images. However, the session faced challenges as participants, including Luciana and Laura, expressed confusion about the pace and sequence of instructions, feeling that Don was moving too quickly through multiple steps without completing earlier ones.
Claude for Design Brief Generation
The team discussed using Claude to generate design briefs and HTML files from website information. Don guided the group through the process of finding website inspiration, creating design briefs using MD files, and generating HTML estimates. They clarified that the process involves copying text from the bid tool output and pasting it into Claude’s prompt to create a polished HTML document. The team members, including Luciana, Mike, Debra, and Ligia, followed along and tested the process, with some successfully generating HTML files that could be used as client-facing estimates.
Client Bid HTML File Issues
The team discussed issues with generating and sharing HTML files for client bids. Don guided participants through the process of renaming files to “index.html” and organizing them into appropriate folders. Ligia demonstrated how to modify the bid tool for e-commerce product photography, though Don clarified that the current tool was designed for internal use rather than client-facing. The team reviewed various implementations, with some members successfully generating bids while others encountered technical difficulties. Joseph presented a different approach using PDF output and prototyping within Claude.
HTML Deployment and Landing Pages
The team discussed deploying HTML files to Netlify and building landing pages using Claude. Don guided participants through the process of uploading their index.HTML files to Netlify and configuring project settings. The group also explored using a Brief Builder tool to create landing pages. Some participants experienced challenges with screen sharing and following along with the steps due to limited screen space. Don mentioned plans to demonstrate how to add logos and customize the landing pages in a follow-up session.
Food Photography Landing Page Creation
The team discussed creating a landing page using Claude, focusing on food photography services. Don guided the group through inputting copy and design elements, including header images and testimonials. Participants were instructed to use screenshots of their websites as design inspiration and to fill out a structured prompt with information about their services and business. Don emphasized the importance of using design elements that reflect their website’s fonts and colors. The team encountered some technical difficulties with accessing and pasting the prompts in Claude, but Don provided guidance to resolve these issues.
Landing Page Tool Debugging Session
The team discussed issues with running a landing page copy generator tool. Don provided instructions for using the tool, including pasting specific content into a chat and dragging an HTML file into Claude for debugging. Several participants encountered an error (Claude Sonnet 4) when trying to analyze images, which was resolved by compressing the image files and implementing fixes suggested by Claude. The team worked through technical challenges with file access and browser headers, with Debra successfully implementing the required header modifications to resolve the API errors.
Brief Builder Tool Integration Issues
The team discussed issues with the Brief Builder tool and its integration with Claude. Trish and Debra experienced errors related to the model string in Claude Sonnet, which were resolved by downloading and replacing the HTML file with the correct version. Luciana encountered additional errors after following the instructions, but the team determined that the process should work once the correct file is used. Don demonstrated how to properly use the tool by uploading a design, analyzing it, and populating the resulting .md file with details like fonts, colors, and content.
Landing Page Creation Workshop
Don demonstrated how to build a landing page using Claude and Visual Basic, emphasizing the importance of organizing files in dedicated folders and using browser tabs efficiently. He showed the process of creating a customized page with images and explained how to deploy it using Netlify. The group discussed the advantages of building custom landing pages compared to using tools like Claude directly, with Don highlighting the potential for creating professional-looking pages without extensive coding knowledge. Don assigned homework for participants to troubleshoot their tools and improve their workflow organization before the next class.
Landing Page Setup Discussion
The team discussed setting up landing pages using Netlify and Claude. Don provided guidance on file naming conventions, explaining that each project needs an index.html file in lowercase folders without spaces. Laura shared her progress on creating a landing page and demonstrated the setup process, though she encountered some issues with image display that needed to be addressed with Claude. The team learned that images should be in landscape format for the main header and either landscape or portrait for the three additional images. Mike reported API key issues that needed to be resolved with Claude’s assistance.
Web Development Tools Troubleshooting Meeting
The team met to discuss issues with their web development tools and landing page deployment. Don guided participants through troubleshooting API key errors and file upload problems, particularly helping Mike resolve issues with his brief builder tool. The group discussed technical details about file formats, including the need for 24-bit PNG files with transparent backgrounds, and addressed questions about deploying pages through Netlify and WordPress. Don announced that new content would be uploaded by the next day and promised additional guidance would be available on page 5 of the course materials by Tuesday.
Mike’s Brief Builder API Troubleshooting
The team worked to troubleshoot issues with Mike’s Brief Builder tool not functioning properly. They discovered that Mike was using a sample API key instead of creating a proper account and obtaining a personalized API key from Anthropic. Once Mike created a proper API key and updated the tool, the Brief Builder successfully analyzed design images. The team also discussed different use cases for various AI tools like Claude for copywriting and Gemini for music composition.
We need to get the text for our site:
For that we can use any of the prompts we have created already, OR, this simple template
Who I am:
What I do:
Who I do it for:
Where I do it
Years of Experience
Testimonials
My specialty for this page
Tone:
Links:
home page link
deep link
email
phone (if applicable)
Call to action (what do you want the viewer to do?)
Now use the tool you downloaded to extract the design information from a site you like. (It can certainluy also be your site. Fill out all the information you got from the above prompt and fill the form in.
Copy the design information/copy blocks into a new prompt window.
Remind the tool to use Framer-Like Animations and Transitions.
If you want to constrain the page, you can do it two ways:
1. Give it a pixel width to not exceed.
2. Give it a percentage width (I like 80%)
Run the prompt.
In the preview window, the images will not show.
Download the file from Claude and into your folder.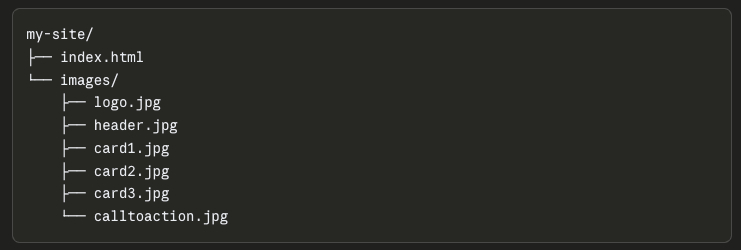
Then drag the .jtml file to a browser window.
You will now see the design with the images.
Narrow the browser window to see how it will render on a phone.
PROMPTS FOR THE CLASS
Prompt for Emails:
- Your name and business name
- Who is the other party, and what is your relationship with them?
- What is the problem or project?
- What outcome do you actually want?
- What have you already tried?
- What was the response or pushback?
- How urgent is this? (Hot / Medium / Cool)
Create a simple prompt for letting Claude know who you are.
- Full name and business name
- Location and the type of work you specialize in (weddings, commercial, portraits, etc.)
- Their typical client (luxury brides, small businesses, families)
- Tone you write in (warm and personal, clean and professional, etc.)
- Any specific language you always or never use
- Website URL and social handles if relevant
- Email address
A Simple Contextual Prompt Lead:
“Here’s my background for context: I’m [Name], owner of [Business]. I photograph [specialty] in [location]. My clients are typically [description]. My writing tone is [description]. My website is [url].”
Writing the Design Tool
This is the brief. A good .md file covers:
- What the tool does in one clear sentence
- The input fields (what the user types in)
- What the output should look like (format, sections, tone)
- Any calculations involved (hourly rate, usage fees, licensing, expenses)
- Design preferences (clean, simple, their colors if they have them)
- Any edge cases or rules (minimum job fee, travel threshold, etc.)
The .md file is what separates a tool that works from one that almost works.
The more specific it is, the less back-and-forth is needed in the build.
MAKE SURE TO ACQUIRE AN API FROM CLAUDE FOR THIS TOOL TO WORK.
The sequence then becomes:
- Find a screenshot of a UI you like
- Claude generates the .md from it
- Strip it to the essentials
- Build the prompt that powers it
- Claude builds the HTML tool from both
Sample Secondary Style File:
# Writing Style Guide
##Voice
Write in first person. Short sentences. No more than two clauses per sentence. Use plain language. If a simpler word exists, use it.
## Audience
Software developers reading a personal blog. They are technical but skeptical of hype. Do not explain basic concepts. Do not oversell anything.
## Constraints
– No bullet points unless the content is genuinely a list
– No section headers unless the piece is over 800 words
– Never use: “game changer,” “deep dive,” “leverage,” “seamless”
– No rhetorical questions
– No closing paragraph that summarizes what was just said
Example in use:
Here is my style guide: [paste contents]
Now write a 400-word post about why I switched from Notion to plain text files.
A short interview that produces a .md file you can download.
The questions should be:
- What are you writing? (blog, essays, emails, documentation, etc.)
- Who reads it?
- Describe your voice in 2-3 adjectives
- Name 3-5 words or phrases you never want to see
- What format rules matter to you? (headers, bullets, length)
You have full access to my Tools.
Let me know which ones you like the best.
The right order of operations: design brief first, copy second, and then the HTML
The prompt pulls both the design and copy together.
That’s how professional web projects actually work.
This is important: the copy slots you’ve named map directly to the image slots you already set up.
So the mental model stays consistent:
header.jpg          → HeaderCopy
(body section)      → BodyCopy
card1.jpg           → Card One Copy
card2.jpg           → Card Two Copy
card3.jpg           → Card Three Copy
calltoaction.jpg    → Call to Action Copy
Each image has a partner. Each section has both a visual and words. When they hand Claude the full prompt, they’re handing it a complete package: structure from the design brief, visuals from the image paths, and words from the copy blocks.
The prompt they end up writing becomes almost formulaic in a good way:
“Build a single HTML landing page using this design brief: [brief]. Use these image paths: [paths]. Use this copy: ©.”
That repeatability is worth pointing out directly in class. Once they’ve done it once, the process for the next client or the next niche is just swapping the three inputs. Same prompt structure, different brief, different images, different copy.
Uploading to Claude Design and pulling the .md (20 minutes)
Find a webpage design that you like and take a screenshot of it.
Upload your screenshot to Claude and ask it to produce a design specification in markdown. A prompt like:
“Analyze this page design and write a markdown file that describes the layout structure, color relationships, typography hierarchy, spacing approach, and visual hierarchy. Focus on the design system, not the specific content.”
You’ll get back something detailed.
Read it for a few minutes.
Ask:
What would change if you used different images?
What would stay the same?
Go to the next section: Building the HTML file.
If it is easy to change out the images without changing the text, you can create a landing page every day if you wanted to.
COPY CHANGES
If you want to create a new landing page, just change up the copy for the sections you have designed, and have Claude remake the page with new copy.
(OPTIONAL): Open up Visual Studio Code with the Greenlight Extension. Visually change the text easily without touching the code (the framework). You will be surprised how easy it is.
Building the HTML file.
Simplifying the .md into a reusable brief (20 minutes)
This process is an important step.
Paste the verbose .md back into Claude and ask:
“Simplify this into a concise design brief I can reuse. It should describe the layout sections, the visual hierarchy, the color approach (warm/cool/neutral, not hex codes), and the typography weight relationships. Remove anything specific to the original content. Keep it under 60 lines if possible. Make sure that it is all you will need to repeat the design. Add interesting animations and transitions (like Framer) where appropriate.”
What you will end up with should be portable.
Test it by asking Claude to build a landing page using only the brief and the image folder structure, without the original screenshot.
If the design feels like the same family, the brief worked.
Deploying to Netlify
Get a Netlify account (free is fine)
Netlify’s drag-and-drop deploy is very simple.
Drag the entire my-site/ folder onto the deploy zone.
The index.html at the root and the images/ folder inside it will work automatically.
Verify the live URLs for each image by checking the browser console for any 404 errors.
If images don’t load, it’s almost always a capitalization mismatch (e.g., header.JPG vs header.jpg).
Check the console before you freak out.
The Formula:
You have the file from the first prompt that explains your business.
We are now going to use that information for writing our text for the Landing Page.
Open Claude.
Give it the .md file we derived from this prompt on Page One:
If you have to do it again, it is this one:
I would like to create an overview of my business to add to my “about me” information for cold outreach emails, answering business queries, and formulating proposals to clients. Ask me 15 questions that will help you know exactly who I am and what I do for the basis of communications. Format this as a prompt I can answer. After we complete this interview, save it as a .md file.
Insert (drag) the .md file into Claude.
Then add this:
We are going to write the copy for my Landing Page.
My Landing Page is to feature my food photography.
I need:
A headline.
A subhedline
An Introduction: 2-3 paragrpahs about what I do and why I should do it for them.
Copy for Card One
Copy for Card Two
Copy for Card Three
An intro to testimonials (there will be three)
A call to action.
Write the copy and we will edit from there.
Ask any questiions you have before proceeding.
Response should have the copy clearly defined:
Headline Copy:
This is where the headline copy goes
Subhead Copy:
This is where the subhead copy goes.
And so forth.
Landing Page Brief
We are going to build a cool landing page from the copy and design brief below.
I have given you my copy in blocks that correspond to the images. Follow the design brief.
# Landing Page Brief
—
(Insert the design and copy brief here
## IMAGES
All images are in the /images/ folder with these exact file names:
– logo.png
– header.jpg
– card1.jpg
– card2.jpg
– card3.jpg
– calltoaction.jpg
Note: Replacement images must match the aspect ratio of the originals. Same file name, same shape.
Note: Logo colors should inform the Primary and Accent color choices above for a cohesive page.
—
## DESIGN STYLE
(Insert Design .md information here)
## BUILD INSTRUCTIONS
Build a single HTML file with embedded CSS.
Use the design style above to guide all visual decisions.
Pull images from the /images/ folder using the file names listed.
Structure the page in this order: Header, Introduction, Three Cards, Testimonials, CTA.
Place the logo in the header navigation area. Do not crop or resize it beyond fitting the nav container.
The page should work without any JavaScript frameworks or external dependencies.
Google Fonts is acceptable if it matches the font feel described above.
Do not use inline styles. All CSS goes in the style block.
Use width: 100% and height: auto on all images. Do not use object-fit: cover.
Use Framer-style animations and transitions when appropriate.
Links at the bottom of the page:
Don Giannatti Studios (https:www.dongiannatti.com)
In The Frame Substack (https://www.dongiannatti.substack.com
EMAIL: don.giannatti@gmail.com (mailto:don.giannatti@gmail.com
Give me a single HTML page that I can deploy at Netlify.
I will populate the images file locally.
Ask any questions before we start.
Keep the replacement images the same relationship when you upload them. (Landscape=landscape.)
CSS handles the display size, not the file size. A 1200px image will scale up or down to fit whatever container the code defines. The HTML and CSS control how it appears on screen; the original file stays untouched.
For the no-cropping goal, the CSS that works best for this is:
img {
  width: 100%;
  height: auto;
}
That tells the image to fill its container horizontally and scale its height proportionally. The full image always shows, no cropping, no distortion.
object-fit: cover is what you want to avoid.
It fills a fixed-height container by cropping whatever doesn’t fit, which is common in web design but not what you want here.
On keeping replacement images the same pixel size: that’s the right instinct, and here’s the practical reason. If a student’s original card1.jpg is 1200x800px (landscape) and their replacement is 1200x1200px (square), the card will change height on the page. Same file name, different proportions, different result.
So the rule is: match the aspect ratio, not just the pixel count. A replacement image doesn’t have to be exactly 1200px, but it should be the same shape as the original. Landscape for landscape, portrait for portrait.