MOTION
Flags in Motion
MEETING NOTES
Quick recap
This was a video production class focused on reviewing stop-motion assignments and discussing upcoming video projects. The class began with participants sharing experiences about extreme heat across different regions, including challenges with air conditioning installation and maintenance. The main portion involved reviewing student stop-motion videos, with Don providing detailed feedback on techniques like light movement, gobo usage, and timing synchronization with music. Students shared their work using various software platforms including DaVinci, CapCut, and iMovie, with discussions about technical challenges like camera shake, slow motion techniques, and looping capabilities. Don emphasized the importance of listening to music beats for proper timing cuts and explained concepts like shooting at different frame rates for slow motion effects. The class concluded with announcements about the next assignment focusing on light movement rather than camera motion, and Don shared resources from professional photographer Annabelle Brakey to demonstrate advanced stop-motion techniques.
Next steps
Don
Inge
Judy
Laura
Luciana
- Look up portable air conditioning units on Amazon UK and consider options for her family in Italy.
- Investigate how to loop a video for her website (Adobe Portfolio) and check if the platform supports it.
Trish
Collaboration
Summary
Extreme Heat Impact Discussion
The group discussed the extreme heat affecting different regions, with participants sharing experiences from the UK, France, Spain, and the southern United States. Inge mentioned challenges with her newly installed air conditioning system due to ductwork issues, while Laura described dangerous working conditions during electrical work in the heat. The conversation highlighted how the high temperatures and humidity make outdoor activities unpleasant and dangerous, with participants noting that beaches and other outdoor spaces are not enjoyable during summer months.
Extreme Weather and AC Solutions
The group discussed extreme weather conditions, particularly focusing on heat waves and the challenges of finding and affording air conditioning units. Don shared his experience with installing a portable air conditioning unit in his office for around $400, while Trish mentioned looking into split AC units for her mother-in-law in England but couldn’t find suitable options due to electrical conversion issues. The conversation then shifted to Don’s Starlink installation, where he expressed frustration at being charged $1,000 for what he considered a simple two-bolt installation, leading to a discussion about finding more reasonable alternatives. The conversation ended with Don preparing for next week’s stop motion class, where students were asked to submit their work through Google Drive.
Stop Motion Video Project Review
The group reviewed stop motion and video projects, with participants sharing their work and receiving feedback. Laura demonstrated how to organize videos in Google Drive and showed improvements to video playback functionality. Don provided detailed feedback on several projects, suggesting improvements like using slow motion, adjusting transitions to match music beats, and maintaining consistent frame rates. The team discussed technical aspects including camera shake, lighting transitions, and software tools like DaVinci Resolve and CapCut. Key feedback included recommendations to use cross-fades instead of hard cuts, match visual elements to music beats, and consider shooting at higher frame rates for smoother slow motion effects.
Video Editing Software Discussion
The group discussed video editing software options, with Inge sharing her frustration with CapCut and exploring alternatives like DaVinci and Canva. Don recommended CapCut for its ease of use, particularly for TikTok content, while warning about potential pro features that could cause issues. The discussion also covered AI tools like ChatGPT and Claude for video editing, with Don advising that AI can create good first drafts but human editors should refine the results, and Laura suggesting DaVinci as a free alternative for those with Adobe’s full Creative Suite.
Video Projects Review Meeting
The group reviewed several video projects, with Debra presenting her work including a stop motion video and a 4th of July video created using DaVinci. Don provided technical guidance on using slow motion techniques at 120 frames per second for creating smooth push-in shots, explaining that this method can effectively extend a one-second movement to four seconds on screen. The team discussed playback issues with videos appearing shorter than expected when shared through Dropbox or Google Drive.
Stop-Motion Video Project Planning
Don announced that next week’s focus will be on stop-motion video projects, specifically involving light and gobo movements rather than camera motion. Students will create 6-8 second clips with three different approaches, including moving lights behind gobos and moving gobos in front of lights. Don shared examples from Annabelle Brakey’s work to demonstrate professional stop-motion techniques and encouraged students to review the provided resources and articles for inspiration.
Week 3 Video Assignment Guidance
The group discussed Week 3’s video assignment, with Don advising students to read all previous lessons but focus on completing the current assignment first. Don provided technical guidance on video recording equipment and settings, recommending cameras over phones and suggesting 8-10 second clips with proper framing. The team clarified that videos should be uploaded to Laura’s Google Drive for organization, though students could also share them on social media, and Don shared a tutorial link for looping videos in DaVinci Resolve to help Luciana with her technical question.
Drama Through Motion
Shaping Light for Video
The central idea for this session.
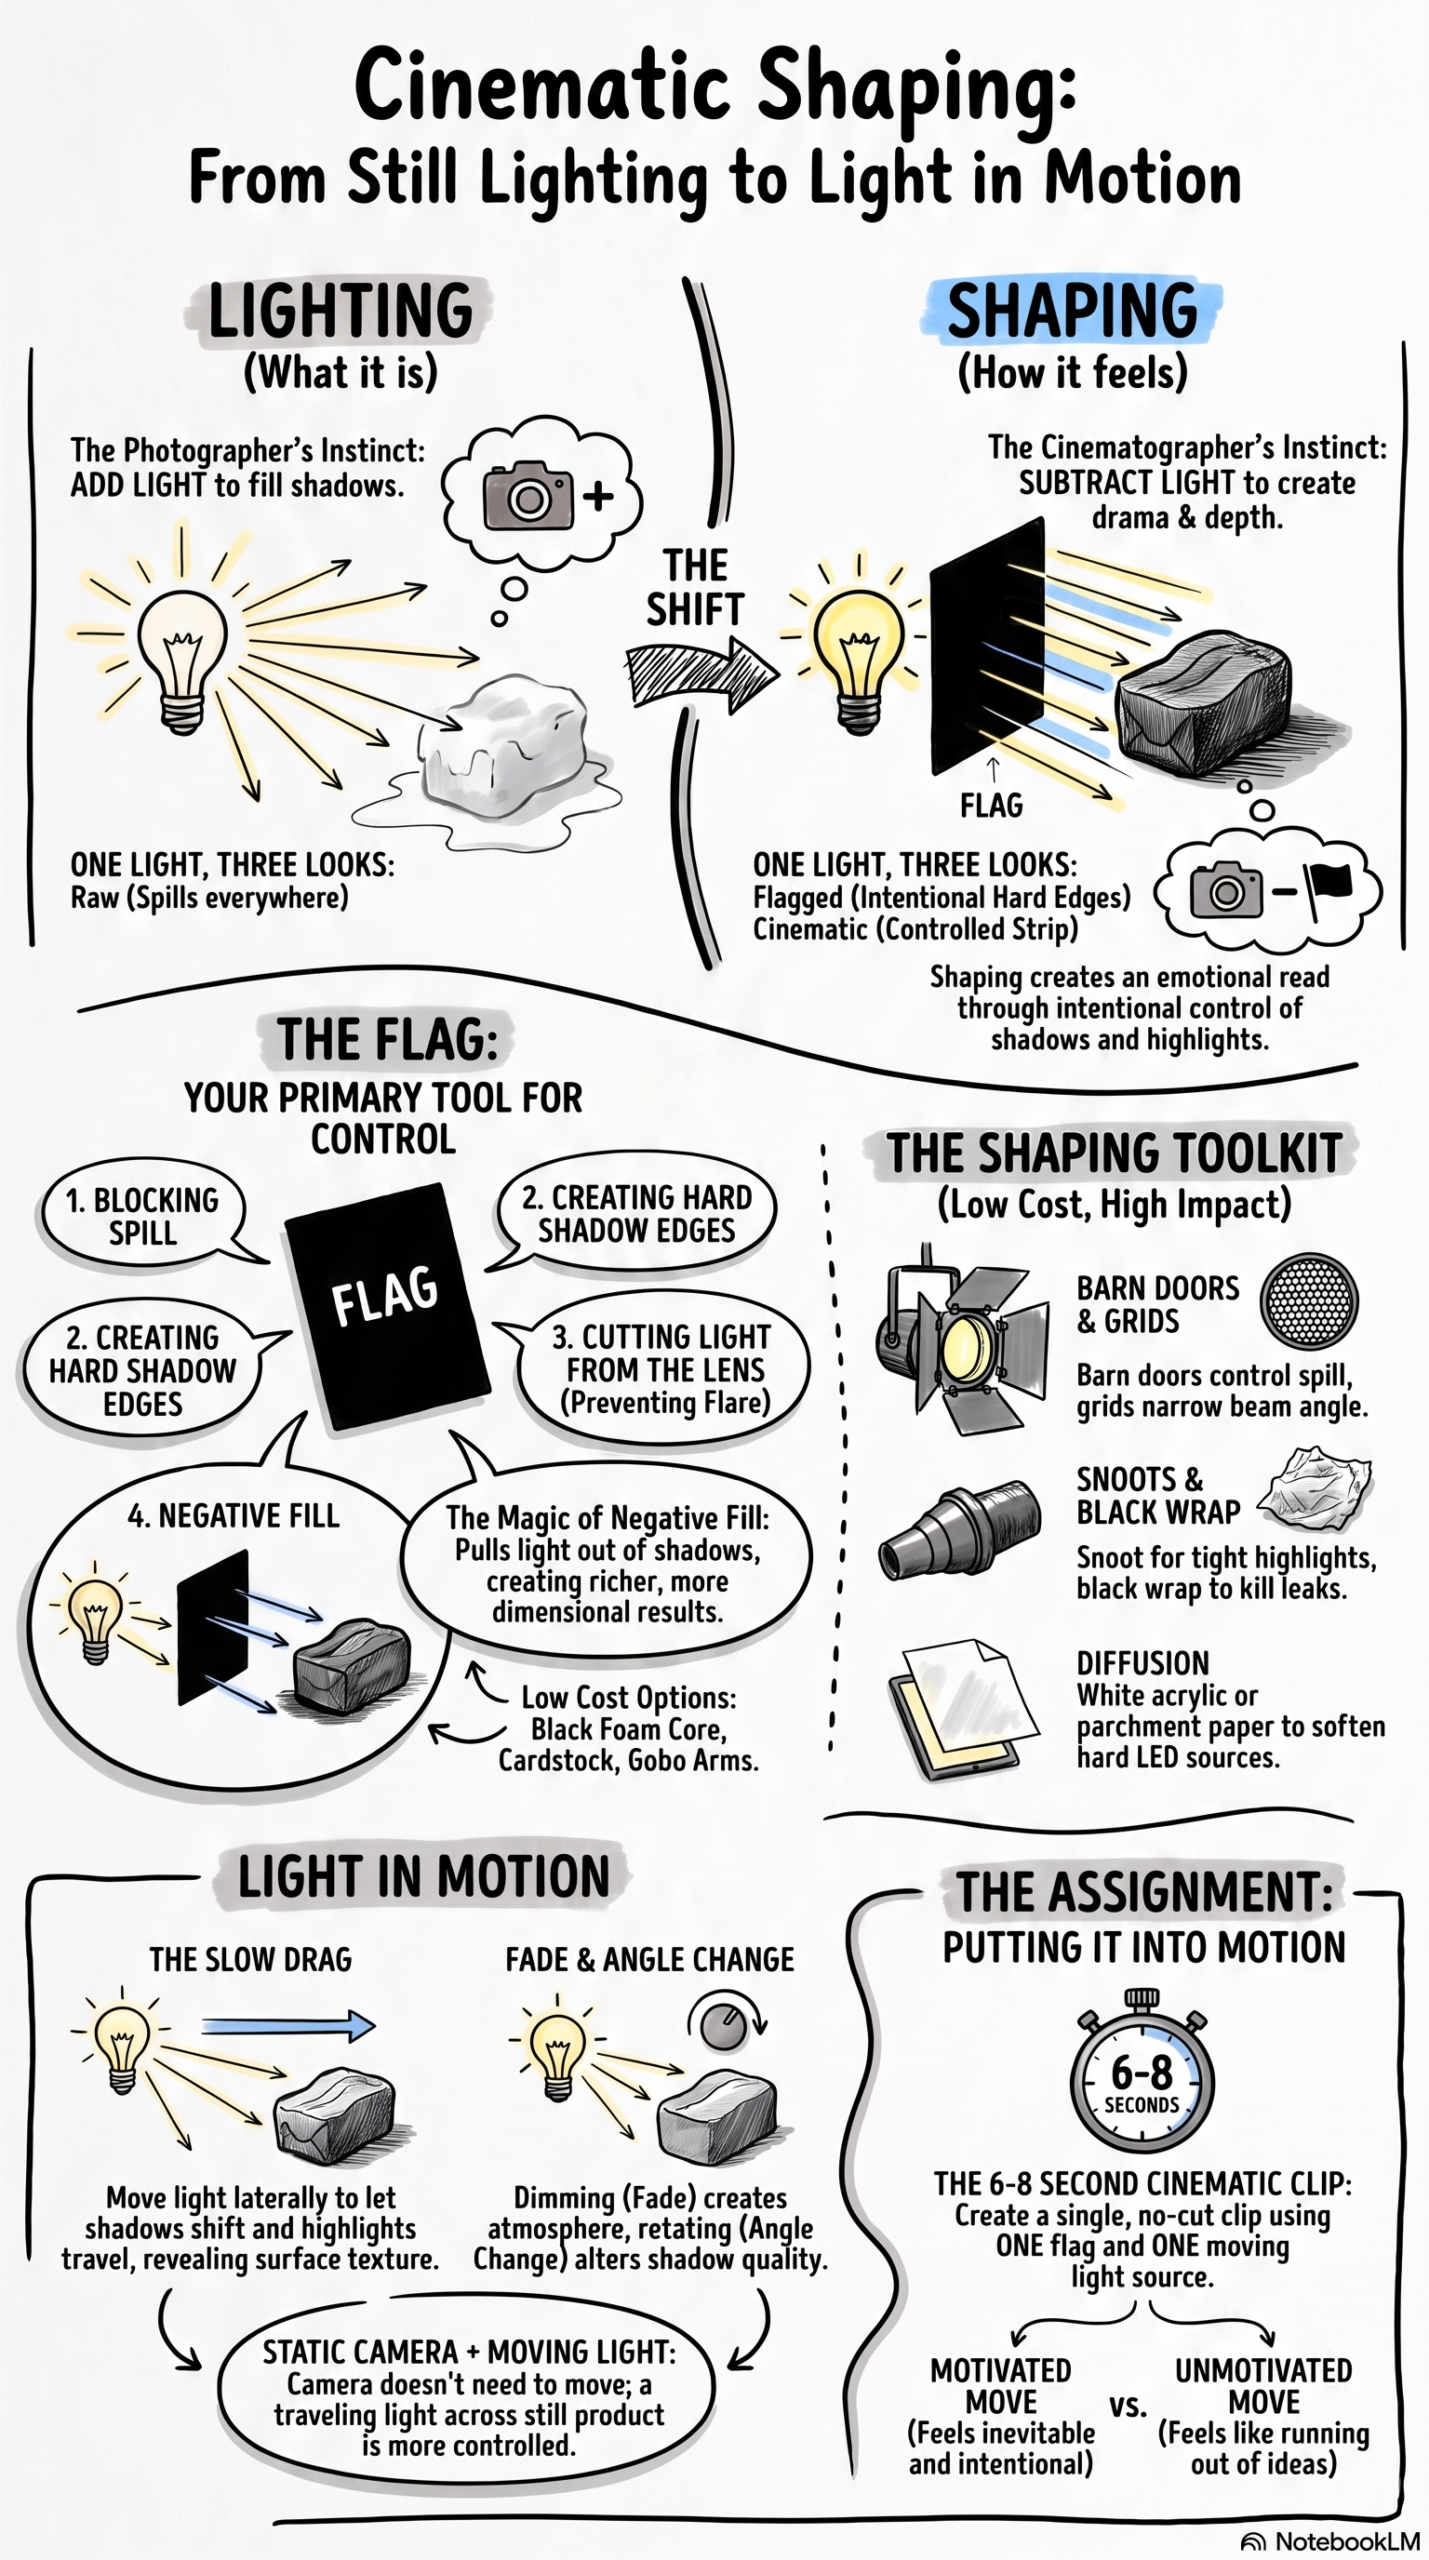
Any light pointed at a product will show you what the product looks like. A shaped light will show you how the product feels. This week is about control — not adding more light, but subtracting, redirecting, and containing the light you already have. And then setting it in motion.
The difference between lit and shaped
Most photographers learned lighting by adding. Another light here, a reflector there, fill this shadow, open that corner. Motion work rewards a different instinct, subtracting. Taking a light source and deciding exactly where it falls and where it stops.
The same product lit three ways with the same single LED panel:
- Raw, unflagged — light spills everywhere, no drama
- Flagged on one side — shadow edge becomes hard and intentional
- Flagged top and bottom — the light becomes a controlled strip, almost cinematic
Same light. Same product. Three completely different emotional reads. That contrast lands harder than any explanation.
Flags: what they are and what they do
A flag is anything that blocks light.
A piece of black foam core.
A black card.
A purpose-built flag on a gobo arm.
The material is less important than understanding what it does.
The four practical uses:
- Blocking spill — keeping light off the background or off a surface you don’t want lit. Containment.
- Creating a hard shadow edge on the product — placing a flag close to the light source to define exactly where the light stops on the subject. This is where drama comes from.
- Cutting light from the lens — preventing flare when the light source is anywhere near the camera’s line of sight.
- Negative fill — placing a black card opposite the light source to subtract reflected light from the shadow side, deepening contrast rather than filling it.
Don’t forget negative fill because it surprises photographers every time. The instinct is always to add light to the shadow side. Pulling light out of it is counterintuitive but produces richer, more dimensional results for product work.
Shaping tools beyond flags
Flags block light entirely. Shaping tools redirect and modify it. Cover the practical ones:
- Barn doors — adjustable flaps on the front of a light that let you control spill without a separate flag stand. Most LED panels accept them. Cheap and useful.
- Grids — fit over a softbox or panel and narrow the beam angle dramatically. Light goes where you aim it and almost nowhere else. Essential for controlled product work.
- Snoots — narrow the light to a tight spot. Useful for product highlights and accents.
- Black wrap — the aluminum foil of the lighting world. Wraps around barn doors or light housings to kill any remaining spill. Cheap, flexible, indispensable.
- Diffusion material — softens a hard LED source. A piece of white acrylic, a sheet of diffusion gel, even parchment paper taped over the panel face. Show them what it changes and what it costs in output.
Emphasize that most of these tools cost almost nothing. A set of black foam core boards, some black wrap, and a grid or barn door attachment handles 80% of the shaping work they will ever do on a product shoot.
Light in motion: moving the light as a storytelling tool (15 minutes)
This is the part that makes the week’s assignment possible. A moving light is not a gimmick — it is a way to show the product changing as the viewer watches. Used with control, it creates the kind of clip that makes people watch twice.
Three approaches to moving light in product motion work:
- Slow drag — the light moves laterally across the product during the clip. Shadows shift, highlights travel, the product reveals itself differently as the light angle changes. Works for anything with surface texture or dimensional form.
- Fade in or fade out — dimming the light up or down during the clip using the dimmer on the panel. Creates atmosphere. A product emerging from darkness or retreating into it reads as more considered than a static exposure.
- Angle change — tilting or rotating the light source during the clip. Changes the quality of the shadow and the direction of the highlight. Subtle angle changes read as more sophisticated than dramatic swings.
Cover the practical reality of executing these moves: someone needs to move the light, or you need a way to automate it. For most of them, that means a second pair of hands or a simple motor rig. Talk through both options. A friend holding the light panel and walking slowly across the back of the set during a take is a completely legitimate production technique.
Also introduce the idea of combining a light move with a static camera. The camera does not have to move for the shot to have motion. A traveling light across a still product is often more controlled and more interesting than both camera and light moving simultaneously.
Assignment: Dramatic Light in Motion
Same product category as before: food, beverage, or lifestyle accessory. They can use the same product or a new one.
The setup constraints:
- Minimum one flag in the setup. It must be doing something specific; document what it is doing in the shot list.
- The light must move during the clip. Camera can be static or include a simple move — you’re choice.
- Duration: 6 to 8 seconds.
- No cuts. Single clip.
- Three clips
Deliverables:
- Three finished clips
- A simple lighting diagram; overhead view, drawn by hand or in Canva, showing light position, flag position, and product placement. Does not need to be beautiful. Needs to be accurate.
- One paragraph (just tell us what you did) describing what the moving light does to the product and why they chose that specific movement.
What you are looking for in critique:
- Is the flag doing something you can see?
Can you identify in the clip where the light stops and why that decision was made? - Does the light movement feel intentional or restless? A motivated move has a quality of inevitability; it feels like it had to happen. An unmotivated move feels like the photographer ran out of ideas.
- Does the lighting diagram match the footage? This is a pre-production habit check.
Week 3 Talking Points — Anticipated Questions
“I don’t have real flags. What can I use?”
Black foam core from any art supply store is the standard substitute and works as well as purpose-built flags for most product work. Cut it to whatever size you need. Black posterboard works. Cardboard spray-painted flat black works. The material just needs to absorb light rather than reflect it — any surface with a sheen will kick some light back into the scene, which defeats the purpose. For black wrap, buy a roll of Cinefoil if you want the real thing, or use heavy-duty aluminum foil painted flat black. A hardware store and a can of matte black spray paint covers most of what you need for under $20.
“How do I know where to place the flag?”
Start with the problem, not the flag. Ask what’s wrong with the light first — is the background getting too much spill? Is the shadow side of the product too open? Is there flare hitting the lens? Each problem points to a specific flag position. For spill on the background, the flag goes between the light and the background, close to the light. For a harder shadow edge on the product, the flag goes close to the light on the shadow side. For lens flare, the flag goes between the light source and the lens. Solve one problem at a time and check playback after each adjustment.
“The flag is showing up in my shot.”
Two causes. Either the flag is inside the frame, or it is close enough to the frame edge that it is reflecting into the lens. Check your monitor with the flag in place before you roll. If it is in frame, move it further back or raise it above the frame. If you are getting a dark edge from a flag that is just outside frame, you have accidentally created negative fill — which may actually be useful. Look at what it is doing to the light before you move it.
“My moving light looks jerky. How do I smooth it out?”
Speed and consistency. The move needs to be slower than feels natural and it needs to happen at the same pace from start to finish. Practice the move five times before you roll. Use both hands on the light — one on the body, one steadying the stand or arm — so the whole rig moves as a unit rather than the head wobbling independently. If you are moving a panel on a stand, unlock the stand head just enough to allow the movement you need and no more. Sloppy moves usually come from too much play in the rig, not from technique.
“How far should the flag be from the light source?”
Closer to the light gives you a harder, more defined cutoff. Further from the light gives you a softer, more gradual transition. Neither is right or wrong — it depends on what the shot needs. For product work where you want a clean separation between lit and unlit areas, start close and pull back until the edge softens to where you want it. For a more atmospheric, moody look, place the flag further from the source and let the falloff be gradual. The only way to learn this quickly is to move the flag during a test record and watch what happens in real time on the monitor.
“What is the light move actually doing to the product that a static light wouldn’t?”
It is showing the viewer that the product has dimension. A static light shows you one relationship between the surface and the light source. A moving light reveals how the product changes as the angle changes — how a label reads differently, how a surface texture catches and releases highlights, how the shadow shifts to show form. For any product with interesting surface detail, a light move communicates three-dimensionality in a way that a single frame never can. The move is not decoration. It is information.
“My negative fill made the shadow side completely black. It’s too dark.”
That is the black card working correctly — possibly too aggressively. Move it further from the product to reduce the effect, or angle it slightly away from the subject so it is absorbing less of the ambient bounce. You can also introduce a very small bounce card opposite the light at a significant distance — far enough to add just a trace of fill without killing the contrast the black card created. The goal with negative fill is not maximum darkness. It is controlled darkness. There is a range between flat fill and crushed black, and your job is to find the point on that range that serves the product.
“Should the camera move and the light move at the same time?”
For a first attempt, no. Moving both simultaneously doubles the number of things that can go wrong and makes it much harder to diagnose what is not working when you watch playback. Get the light move working cleanly on a static camera first. Once that is consistent, try adding a subtle camera move and see what the combination does. When both moves work together, the result can be genuinely compelling — but only if each move is motivated and neither one fights the other for the viewer’s attention.
“How do I light something that is reflective — a bottle, a glass, a shiny surface?”
Reflective surfaces show you the light source, not the light itself. What you see in the reflection is whatever is in the environment — so the flag, the ceiling, your shirt, the camera — all of it can show up. The approach for reflective products is to control the entire environment, not just the light. Large diffusion panels or white cards become the light source that the surface reflects, giving you a clean gradient rather than a hotspot. For a moving light on a reflective surface, the reflection travels across the surface during the clip, which can look beautiful if it is smooth and deliberate. Test extensively before rolling — small changes in light position produce large changes in the reflection.
“My lighting diagram doesn’t match what I actually shot. Should I update it after?”
Yes, always. The diagram you draw after the shoot is more valuable than the one you drew before it, because it is accurate. Update it to reflect what you actually did, then write one sentence about why it changed from the plan. Over time that annotation becomes a record of how your thinking on set differs from your thinking in pre-production — and that gap closes as you shoot more. The before diagram is a plan. The after diagram is a reference you can actually use again.
Sharp student question: “Is there a way to use a flag to create a moving shadow without moving the light?”
Yes. If you move the flag slowly across the beam during the clip, the shadow edge travels across the product even though the light stays stationary. This is a useful technique when the light rig is heavy or difficult to move cleanly — you get a traveling shadow with a much smaller, easier movement. The effect is different from moving the light itself: the light angle stays constant, so the highlight position does not change, only the shadow. Whether that serves the shot depends on what you are trying to communicate.
Sharp student question: “What is the relationship between flag distance from the subject versus flag distance from the light?”
These control two different things. Flag distance from the light controls the softness of the cutoff edge — close to the light gives a harder edge, further away softens it. Flag distance from the subject controls how much of the subject is affected. A flag very close to the subject will shade a small, precise area. The same flag moved back toward the light will shade a larger area with a softer transition. Understanding that these are independent variables lets you dial in exactly the shadow quality and coverage you want. Most photographers discover this through accident before they understand it conceptually — so framing it clearly now saves them a lot of trial and error on set.