
MOTION
Getting Serious About Stop Motion
Meeting notes
Quick recap
The meeting was a class session led by Don, focusing on reviewing stop motion homework and introducing the next assignment on time lapse photography. Participants shared their stop motion projects, with feedback on technical aspects like frame rates, lighting, and music selection. Luciana discussed her use of Epidemic Sound and Dragonframe software for her project, while others asked about these tools and their features. Don demonstrated the Insta360 camera and discussed its capabilities. The group also discussed time lapse techniques, including interval settings, exposure drift, and potential subjects. They referenced notable photographers like Stephen Wilkes and Neil Van Niekerk for inspiration. Personal updates were also shared, including Trish’s air conditioning repair and Debra’s power outage due to utility work. The class concluded with instructions for the time lapse assignment.
Next steps
Don
Lail
Laura
- Look for the old Kwikset smart lock and consider donating it to Don if he wants it.https://tasks.zoom.us?
meetingId= 8mAsg2HPTaKVRIQe0qqLZg%3D%3D& stepId=f68db317-98be-11f1- 9b2f-760e2959cfee - Try to find and share the link to the cactus flower blooming time lapse video.https://tasks.zoom.us?
meetingId= 8mAsg2HPTaKVRIQe0qqLZg%3D%3D& stepId=f68dc9cd-98be-11f1- bafc-760e2959cfee
Mikala
luciana
- Look up Ormond Beach as the “birthplace of speed”.https://tasks.zoom.us?
meetingId= 8mAsg2HPTaKVRIQe0qqLZg%3D%3D& stepId=f68dac6b-98be-11f1- bd89-760e2959cfee - Share the name of the Epidemic Sound software and its integration with DaVinci in the chat.https://tasks.zoom.us?
meetingId= 8mAsg2HPTaKVRIQe0qqLZg%3D%3D& stepId=f68dc58f-98be-11f1- 825a-760e2959cfee
Collaboration
- All attendees: Watch the provided YouTube videos about time lapse, especially the “interval suggestions” video, to prepare for the assignment.https://tasks.zoom.
us?meetingId= 8mAsg2HPTaKVRIQe0qqLZg%3D%3D& stepId=f68dbd52-98be-11f1- a978-760e2959cfee - All attendees: Complete the Class 6 assignment, which is to create a time lapse video on any subject of their choice.https://tasks.zoom.us?
meetingId= 8mAsg2HPTaKVRIQe0qqLZg%3D%3D& stepId=f68dc006-98be-11f1- a02d-760e2959cfee
Summary
Camera Equipment and Home Repairs
Trish and Luciana discussed camera equipment, specifically lenses for Trish’s Canon R6 Mark II camera with RF mount. Trish mentioned she received notifications about refurbished 56mm lenses but they don’t have the correct mount. Trish also shared details about recently repairing her air conditioning system, which cost over $3,000 in parts despite being under warranty, and discussed the challenges of living in an older home in Ormond Beach, Florida that was damaged by hurricanes in 2004. The meeting started with some confusion about the timing, as Laura had trouble joining 30 minutes early.
Class 5 Homework Review Meeting
The group discussed technical issues and personal updates before reviewing Class 5 homework for Class 6. Don mentioned they would be working on time lapse assignments next week, and several participants, including Mikala, acknowledged they had not completed the previous week’s assignments due to the break. The conversation ended with Becky joining late and mentioning she had only completed a basic version of the required work.
Stop Motion Video Review Meeting
The team reviewed stop motion video projects, with Beckystinehour presenting a 12 frames per second video that had some jerky movement due to camera settings and lighting issues. Debra’s video was well-received, with feedback on improving the final frame hold duration and considering different video players for better display. Judy presented a square format video focusing on movement practice, with the team suggesting adding music to enhance the effect.
Video Production Software Experience
Luciana shared her experience using Epidemic Sound software with DaVinci to manage music for a video project, finding it helpful for selecting and arranging music without extensive editing. She also discussed using DragonFrame software for the first time, particularly for its onion skinning feature, which she found useful for setting up the path of a can in the video. Luciana encountered technical challenges with the rig, including issues with acrylic rods and clips, which required adjustments like emptying the can and using Photoshop to address the hole. Don and Laura provided suggestions for clamps and equipment for future projects at scale.
Photo Projects Review Meeting
The group reviewed photo projects, with Don providing feedback on composition techniques and suggesting starting with a square format before expanding to landscape. Lail mentioned not having work ready this week but planned to share it later in the week on the Facebook group, while Laura indicated she would finish her project. The conversation concluded with casual discussion about weather and brief mention of Dragonframe software, though the question about it was cut off at the end of the transcript.
Software and Music Licensing Discussion
The group discussed software and music licensing options. Luciana recommended the Dragon Frame software with a controller, explaining that the controller can be purchased separately at a discounted price after ordering the software. She also shared her positive experience with Epidemic Sound’s music licensing service, particularly praising its AI music selection feature and integration with DaVinci software. Don briefly mentioned shooting video in Utah and acknowledged needing to improve his video editing skills.
Insta360 Camera Experience Discussion
Don discussed his experience using an Insta360 camera during his road trip, explaining how he initially struggled with creating content but found his preferred approach of using voiceover with footage rather than on-camera presentation. He shared detailed features of the camera, including its 12-megapixel and 50-megapixel capabilities, wide-angle lens with 2X zoom, and excellent audio quality, noting it cost around $500. The group provided advice about camera bundles and sales, with Laura suggesting waiting for Labor Day discounts and recommending specific Insta360 products.
Camera Models Comparison Discussion
The group discussed different camera models, with Laura comparing her Insta360 GO 3S to Don’s Ace Pro 2. Don demonstrated how the Ace Pro 2 works with and without the ProGrip, explaining that the ProGrip provides better battery life and makes the camera easier to hold. Don noted that the camera gets about 2.4 hours of battery life at the lowest power setting, though this decreases to around 40 minutes when shooting 6K video.
Time-lapse Photography Techniques Discussion
Don discussed time-lapse photography techniques, explaining how memory cards have become expensive due to AI demand. He advised on setting appropriate intervals for capturing time-lapse footage, noting that exposure drift must be managed carefully when using cameras with locked settings, while phones handle this automatically. Don shared his experience capturing clouds over Bryce Canyon, emphasizing the importance of adjusting frame intervals based on the desired video length and movement speed.
Time-Lapse Photography Techniques Discussion
Don led a discussion about time-lapse photography techniques, sharing examples of capturing flowers blooming, construction sites, and other natural phenomena over extended periods. He explained various time-lapse concepts including the “Holy Grail” technique of capturing daylight to nighttime transitions, and mentioned how Casey Neistat used time-lapse in his video introductions. The group discussed specific examples like century plants and cacti blooms, with Mikala sharing her experience with a century plant and recognizing Stephen Wilkes’ photography work.
Time-Lapse Photography Techniques Discussion
The group discussed time-lapse photography, focusing on two photographers: Stephen Wilkes and Neil Van Niekerk. They explored Wilkes’ technique of capturing thousands of photos over hours or days using a Lindhoff camera with a Phase 1 digital back in 4×5 format, then compositing them into stunning images like his famous “Day to Night” series. Laura shared that her friend Neil Van Niekerk, a New York-based photographer, won an Emmy for his time-lapse work on an MLB mural project, which has become half of his business.
Time-lapse Photography Project Discussion
Don discussed a photography project involving time-lapse photography, sharing examples of Stephen Wilkes’ work and explaining that students can choose any subject for their assignment. Don provided technical guidance on using intervalometers, noting that modern cameras like the Sony A7C and Canon 6D Mark II have built-in intervalometer features. The class took a break and agreed to reconvene at 9 o’clock for a cloud class.
Timelapse compresses time.
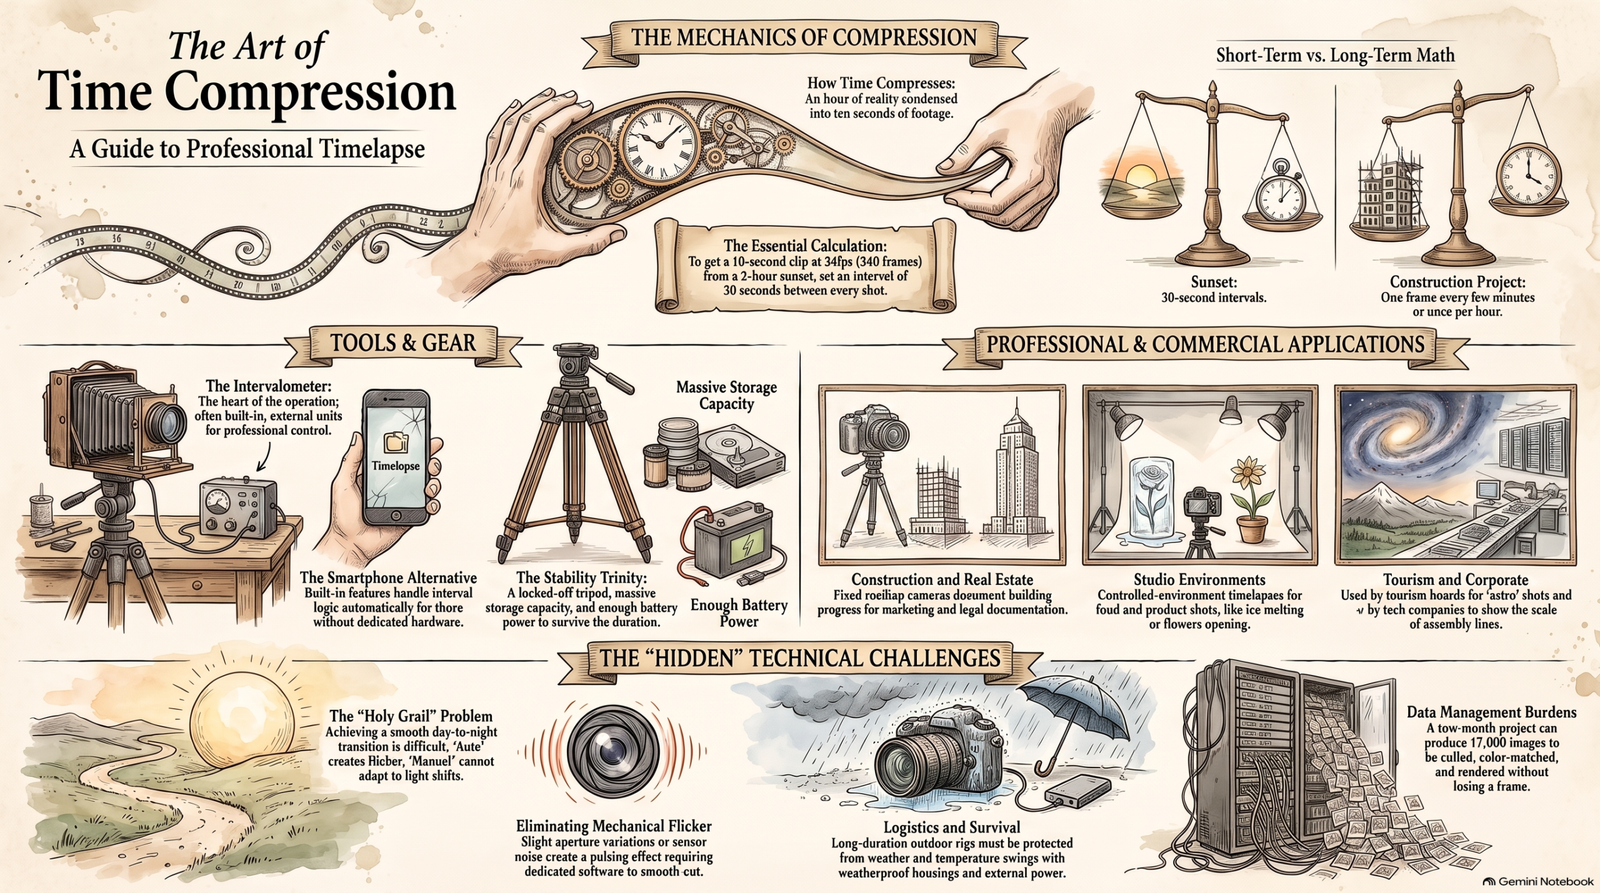
You shoot a sequence of stills at set intervals, then play them back at normal video speed, so an hour becomes ten seconds or a month becomes a minute. It’s one of the oldest tricks in the camera book, but it still gets used constantly in commercial work because it shows change in a way no other technique can.
How it actually works
The math is simple. Say you want a 10-second clip at 24fps. That’s 240 frames. If you’re shooting a sunset over 2 hours, you divide 2 hours by 240 frames, which gives you an interval of 30 seconds between shots. Shoot on that interval for 2 hours, drop the 240 stills into an editor, and you get your 10 seconds.
Longer subjects need longer math. Construction timelapses running for months use intervalometers set to shoot one frame every few minutes, sometimes once an hour, then get edited down from thousands of frames.
The gear side is straightforward: a camera on a locked-off tripod, an intervalometer (built into most modern cameras or added externally), and enough storage and battery to survive the shoot. The harder part is everything around that.
Where it shows up commercially
- Construction and real estate — building progress from groundbreaking to ribbon-cutting, usually shot for months from a fixed rooftop camera. Contractors use this for marketing and for documentation both.
- Product and food — ice melting, flowers opening, coffee being poured, paint drying and cracking. Short-interval, controlled-environment work, often shot in a studio rig rather than outdoors.
- Astro and landscape for tourism boards — Milky Way rotating over a landmark, clouds racing over a coastline. Used in destination marketing because it does something a static photo or normal video can’t.
- Retail and events — a store being built out overnight, a stadium filling before kickoff, a festival setting up and tearing down.
- Corporate and tech — server rooms, assembly lines, offices transforming, used in explainer and brand videos to suggest scale and motion without narration.
The challenges
Exposure drift is the big one. Shoot a sunset in manual mode and the light changes constantly, but your camera doesn’t adjust unless you tell it to. Shoot in auto and every frame exposes differently, which creates a flicker when played back, sometimes called the “holy grail” problem because balancing a day-to-night transition without flicker is genuinely hard to pull off cleanly.
Flicker itself is a separate headache even within a single lighting condition. Small variations between frames, caused by aperture mechanics, sensor noise, or even slight cloud cover, show up as a pulsing effect once you play the sequence back at speed. There’s dedicated software (LRTimelapse is the standard one) built just to smooth this out.
Storage and time are the practical costs. A two-month construction timelapse shooting one frame every 5 minutes produces roughly 17,000 images. All of them need to be culled, color-matched, and rendered, and if even one frame is corrupted or missing, you either interpolate around it or accept a stutter.
Weather and equipment survival matter for anything shot outdoors over days or weeks. Rain, dust, temperature swings, and battery life all become production problems, not just creative ones. Long-duration rigs often need external power and weatherproof housings, plus a plan for what happens if the camera gets bumped or the composition shifts.
Client expectations are their own challenge. A client who wants “a timelapse of our new building going up” usually doesn’t understand that this means months of unattended shooting, backup systems, and a real risk that six weeks in, something goes wrong and you’ve lost the sequence. That gap between what a timelapse looks like on-screen (effortless, magical) and what it takes to produce (logistics-heavy, unglamorous) is worth addressing directly with clients up front.
For a motion graphics portfolio, timelapse is important because it’s really about frame rate manipulation, which is the same underlying idea you will hit again with hyperlapse, slow motion, and speed ramping. It’s a good bridge concept because it makes the relationship between capture rate and playback rate visible and easy to demonstrate.
ASSIGNMENT:
CREATE A 20 SECOND TIME LAPSE VIDEO
NOTE:
If you do not have an intervalometer, use your camera on your phone. All the phones have it.
Exposure drift and flicker are two of the most significant challenges in timelapse photography, and they are directly tied to your camera’s exposure settings.
- Exposure Drift: This occurs when you shoot a changing light environment, like a sunset, in manual mode. Because your camera’s settings are locked, it cannot adjust as the natural light shifts.
- Flicker: If you attempt to avoid drift by shooting in auto mode, the camera’s meter will expose each frame slightly differently, creating a distracting pulsing effect when played back at speed. Even under stable, single-source lighting, flicker can still be introduced by aperture mechanics, sensor noise, or slight cloud cover.
- Physical Drift: In outdoor environments, physical composition shifts or drift can also happen if the camera is bumped or affected by weather elements like rain, wind, or temperature swing.
How to Address These Issues
Perfectly balancing a day-to-night transition (often called the “holy grail” problem) is genuinely difficult to pull off cleanly in-camera, they highlight two main ways to address these challenges:
- Post-Processing Software: Instead of trying to prevent flicker entirely during the shoot, the standard approach is to smooth out the pulsing effects afterward using dedicated software, with LRTimelapse being the industry standar.
- Rig Protection: To protect against physical drift or camera movement during long outdoor shoots, setups require weatherproof housings and a clear plan for what to do if the camera gets bumped or the composition shifts.